QA Guide Rails
Introduction
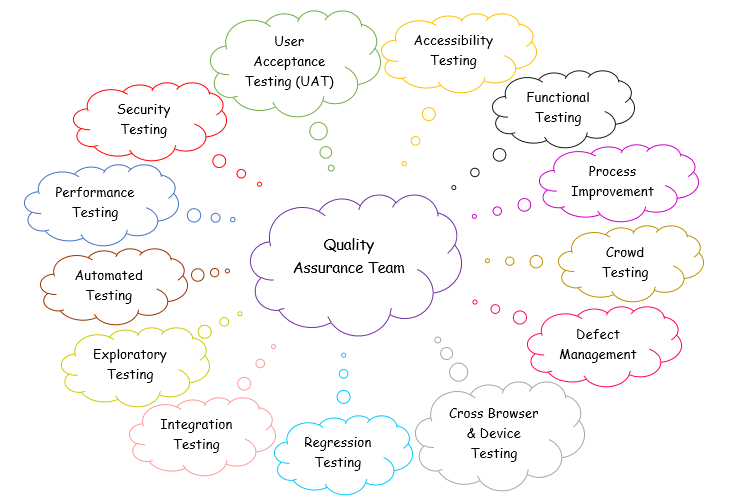
The QA Team's mission is to drive quality into all software products produced by/or on behalf of CRUK. The QA Team will follow a programme of continuous Test Improvement to ensure long term, measurable improvements aligned to their business, technology and testing requirements.
This document describes a set of guide rails for Quality Assurance these are based on the existing best practices for testing at Cancer Research UK.
Quality Assurance Approach and Process
When & how to engage with the QA Team
This guide rail defines the approach and process to be followed by all teams at the start of projects involving new, legacy and 3rd Party CRUK products/tools.
The QA Team is striving to enhance CRUK's testing service throughout the project lifecycle and ultimately assist technology in improving the quality of product we deliver to our supporters, whilst pushing defect discovery forward in the lifecycle.
We are striving to do this in the following ways:
- Testing resources to support Products and Projects
- Early engagement for scoping Testing Requirements
- Static testing on Project requirements to ensure clarity and un-ambiguity for all concerned, and on Projects designs to ensure they are in line with requirements
- Governance and Assurance around testing performed by suppliers prior to delivery to CRUK Structured, Documented System Testing that provides tractability back to project requirements and strives to prevent functional defects from moving into UAT (User Acceptance Testing)
- Providing specialist testing needs such as Automation, Load, Performance, Security, Accessibility and Cross Browser etc.
- Managed, Structured co-ordinated UAT phases
- Smoke testing in Production post release.
- Regression testing to support future releases for 3rd Party systems and integrations.
In order to help us gather as much information as possible about your testing and resource requirements, please consult the QA Checklist below, before meeting with the QA Manager or one of the QA Leads.
- Background and overview of the project
- Project timeline
- Does it require internal and/or external development
- SDLC (Software Development Life Cycle) timeline
- Background of what the system does and any documentation, system requirements, designs, business cases etc.
- Details of the system infrastructure (e.g. Java / .NET / ASP / SQL Server / MySQL)
- Key Stakeholders involved
- Product/Project Team involved
- Has it been submitted to the PMO
Assurance approach
Projects should require sign-off or Test Summary Reports before being deployed to Production. This may be dependent on release process undertaken as part of respective products. Retrospectives could highlight whether the QA team were or weren't engaged earlier enough.
Exception process
The QA Manager and Project Manager should agree that this guide rail will not be followed for the defined projects/phases
Agile Products: BDD
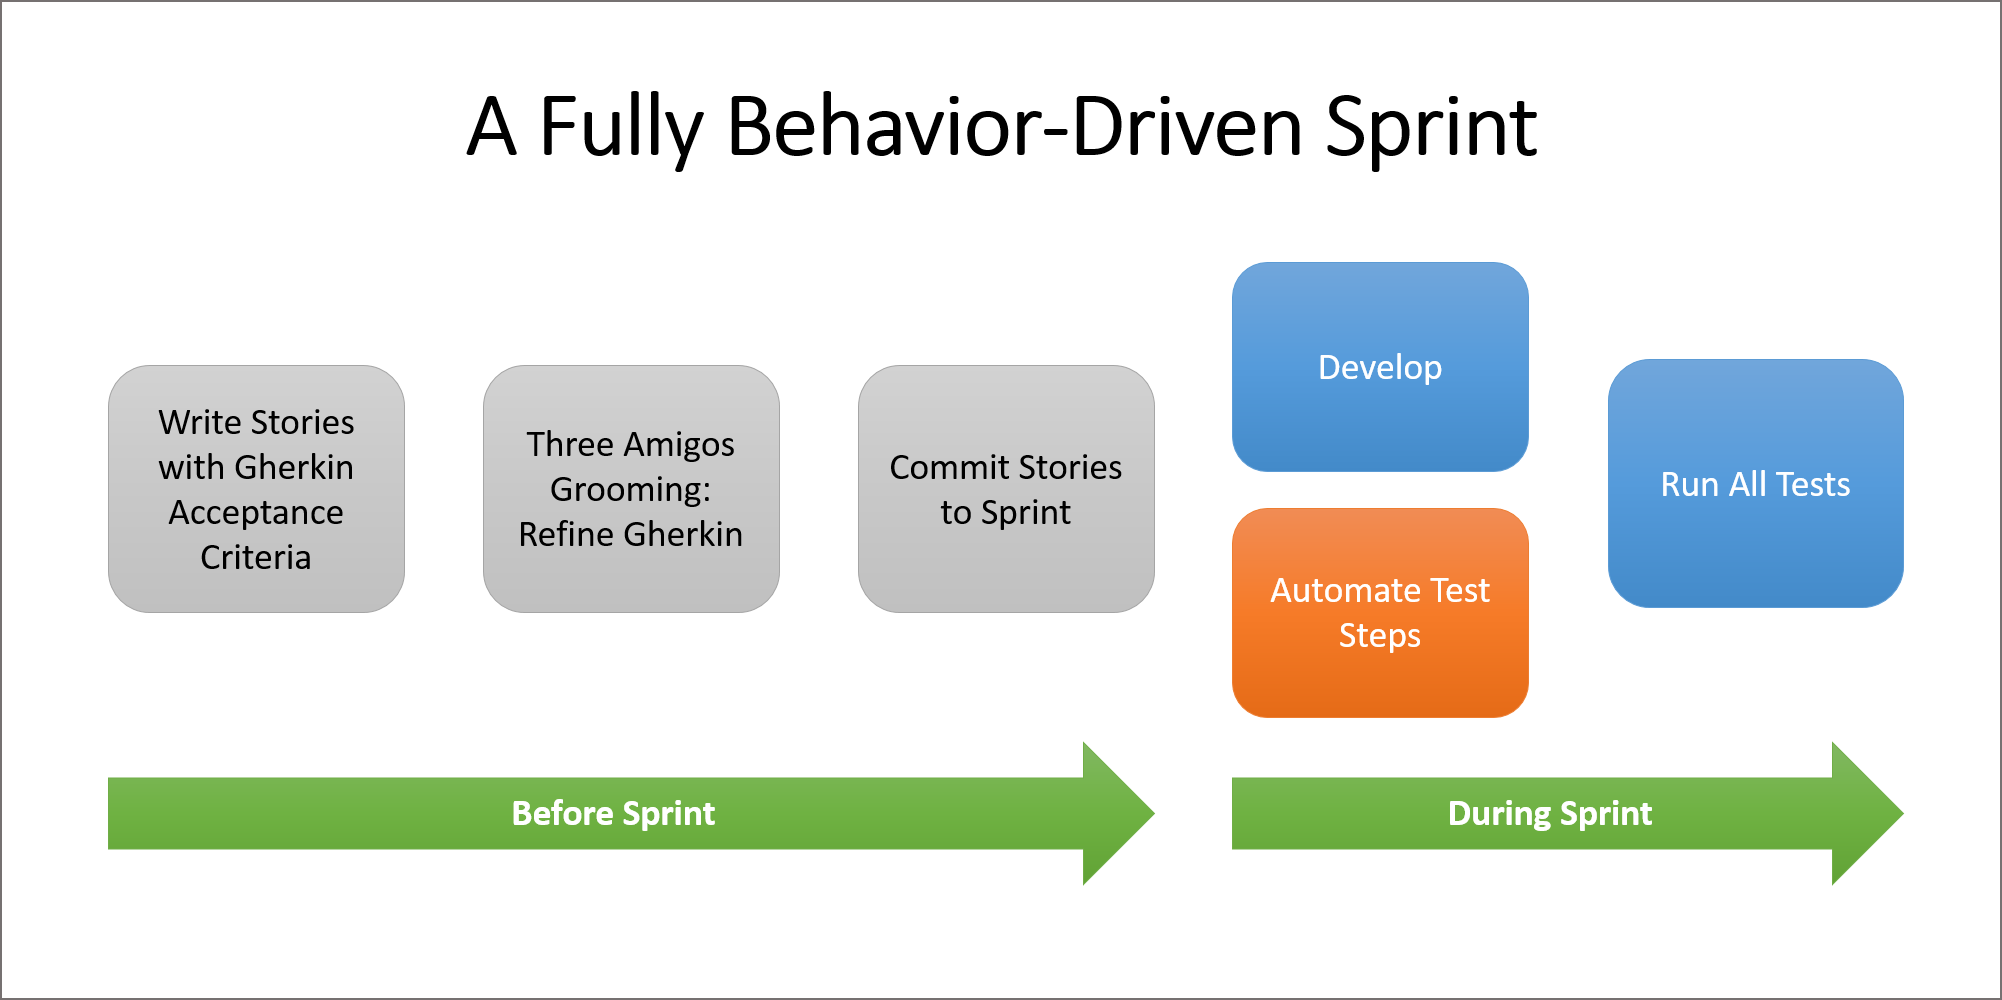
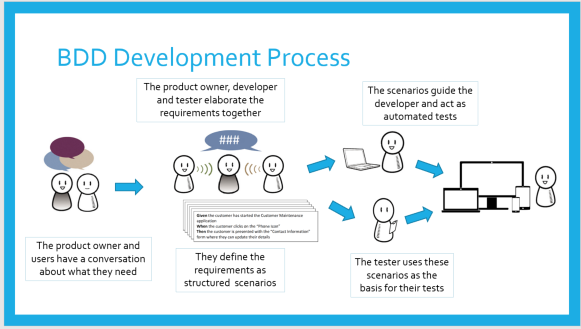
Project Teams using an Agile approach for their Product Management, Design, Development and Delivery should use BDD (Behavioural Driven Development) to assist in getting product owners, business analysts, testers and developers working together.
BDD combines requirements and testing into a single approach, ensuring that requirements are written in a structured language that can be easily understood everyone in the team, plus it can be used to check that each feature has been delivered as specified, by automatically running a test.
Reasons for using BDD:
- Increased and improved collaboration amongst all members on the project.
- High visibility into the project’s progression.
- The software design follows business value.
- The ubiquitous language is understandable by all the members of the team, which reduces misconceptions and misunderstanding and makes it easier for new members to join the working process.
- Software development meets user need.
- More confidence from the developer’s side that they won’t break code and have better predictability when it comes to their work.
- By improving the quality of the code, you are reducing maintenance costs and minimising the project’s risks.
Automation
At present, we use Playwright as our test automation framework to automate our functional and e2e tests.
Steps & Roles
A summary of the steps and roles involved within the BDD process is shown in the table below
1. Discuss: Discussion or workshop to create a shared understanding of the required feature / user stories.
Identify real-life scenarios and examples that have realistic context.
This could be the 3 Amigos session consisting of Product Owner, Developer & QA Person to identify the happy and sad path scenarios.
Role Participation: Business, Developer, QA
2. Distil: Distil the required feature into an executable specification based upon the user stories, examples and acceptance criteria. Specifications are kept in human readable form using the following format:
Feature/Story: Title
In order to [value]
As a [role]
I want [feature]
Scenario Outline: Title
Given [context]
And [more context]
When [event]
Then [outcome]
And [another outcome]
Role Participation: Business, Developer, QA
3. Develop: Develop the required feature using automated test-first practices. Automated acceptance tests are built around the identified scenarios. Automated tests are used to support unit and system testing.
Identify potential automation candidates suitable for unit/API/GUI testing
Role Participation: Developer, QA
4. Demonstrate: Demonstrate the implementation by running the acceptance tests and performing manual exploratory tests.
Role Participation: QA
Assurance approach
Running automated tests during each sprint demo and overnight execution of automated tests
Exception process
The QA Manager and Project Manager should agree that this guide rail will not be followed for the defined projects/phases
Non Agile Products: ISEB 8 Point Check
What is '8 Point Check' and Why is it important?
The purpose of the 8 Point Check is to review the project's Business or Functional Requirements in order to highlight any issues or ambiguities in them and ensure complete clarity for the entire project team, well before any action is taken on the Requirements.
The rationale for adopting the 8 Point Check is that if a tester cannot interpret the Business Requirements with utmost clarity, then the probability of scripting the tests incorrectly increases dramatically. The same analogy can be applied to the Development team. Unless the Requirements are defined very clearly, it is more likely that developers will not build what the Business intended to have. Identifying and resolving ambiguities in Business Requirements at the Requirements Definition Stage is a lot quicker, cheaper and easier to manage than go through the entire SDLC (Software Development Life Cycle) or find defects in the System Testing Phase. It is estimated that up to 60% of defects on projects can be traced back to ambiguities in the Requirements.
Prerequisites or Considerations
In order for the 8 Point Check to produce a valuable outcome, a Business or Functional Requirements document should be provisioned, as a prerequisite, for the project being worked on. Only then can the criteria of the 8 Point Check be applied to the Requirements.
At what Stage/Phase should the '8 Point Check' be executed?
The 8 Point Check should be executed as early as possible in the project stage, typically, when the first draft of the project requirements are published. The earlier any ambiguities can be identified and eliminated, the better the savings on the project resources will be. The results of the 8 Point Check should be shared with the Lead Business Analyst/Business Analyst, who will then address the feedback as appropriate and publish a revised draft version of the Requirements, clarifying any uncertainties in the process. The 8 Point Check should then be executed against the revised version and the exercise should continue until the Requirements document satisfies the 8 Point Check completely. The Requirements can then be sent forward for a business sign-off. The signed-off version should be considered as 'the baseline'. It has to be ensured that the Requirements are not base lined prior to passing the 8 Point Check.
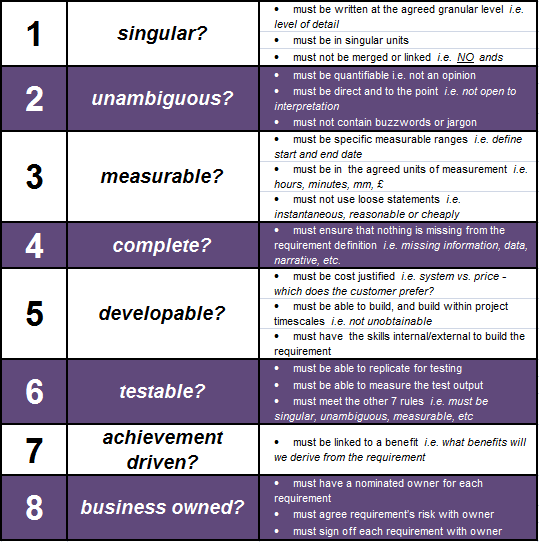
The following are the 8 Points to check on each Requirement:
To execute the 8 Point Check, follow the Steps mentioned below:
- Download the attached template: CRUK 8 Point Check Template V0 03 DSW 221010.xlsx
- Save a copy in your project Directory under Static Testing.
- Copy in all of the requirements as per the format in this example.
- Work through each requirement in turn, answering each of the 8 criteria separately, using the definitions provided above.
- Use 'P' to pass it and 'O' to fail it
- Use 'Y' to 'Include' the rows containing Requirements. Use 'N' on the rows that contain Headings in order to exclude them.
- Add any notes or questions you have, in the 'Comments' section, as you work through the Requirements. It is good to put yourself in the mindset that you are trying to write a test so anything you are not clear of, can be noted down as questions to the Business or the Business Analyst.
- Complete the '8 Point Check' for all requirements and review the results.
- Send the document to the Business Analyst and arrange a meeting to discuss the details.
- Set the expectations and a deadline for the revised Requirements document.
Assurance approach
Completing the '8 Point Check' should be an Exit criteria for Requirements and Entry criteria for Development
Exception process
The QA Manager and Project Manager should agree that this guide rail will not be followed for the defined projects/phases
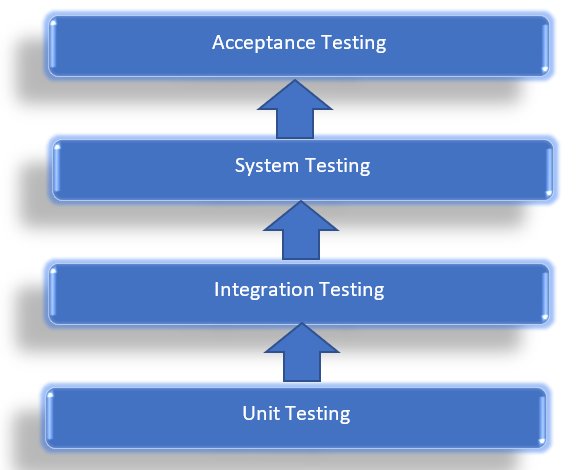
Integration Level Testing
Integration Testing is defined as a type of testing where software modules are integrated logically and tested as a group.
A typical software project consists of multiple software modules, coded by different programmers. Integration Testing focuses on checking data communication amongst these modules.
Integration Testing can be done in the following areas:
- Integration testing: Testing performed to expose defects in the interfaces and in the interactions between integrated components or systems.
- Component integration testing: Testing performed to expose defects in the interfaces and interaction between integrated components.
- System integration testing: Testing the integration of systems and packages; testing interfaces to external organisations (e.g. Electronic Data Interchange, Internet).
Integration test procedure irrespective of the Software testing strategies
- Prepare the Integration Tests Plan
- Design the Test Scenarios, Cases, and Scripts.
- Executing the test Cases followed by reporting the defects.
- Tracking & re-testing the defects.
- Steps 3 and 4 are repeated until the completion of Integration is successful.
Integration Test Approaches
1. Big Bang: Here all components are integrated together at once and then tested.
Advantages: Convenient for small systems.
Disadvantages:
- Fault Localization is difficult.
- Given the sheer number of interfaces that need to be tested in this approach, some interfaces link to be tested could be missed easily.
- Since the Integration testing can commence only after "all" the modules are designed, the testing team will have less time for execution in the testing phase.
- Since all modules are tested at once, high-risk critical modules are not isolated and tested on priority. Peripheral modules which deal with user interfaces are also not isolated and tested on priority.
2. Bottom Up: In the bottom-up strategy, each module at lower levels is tested with higher modules until all modules are tested. It takes help of Drivers for testing
Test Drivers are needed to simulate higher level units which may not be available during the initial phases.
Advantages:
- Fault localization is easier.
- No time is wasted waiting for all modules to be developed unlike Big-bang approach
Disadvantages:
- Critical modules (at the top level of software architecture) which control the flow of application are tested last and may be prone to defects.
- An early prototype is not possible
3. Sandwich/Hybrid: It is an approach to Integration Testing which is a combination of Top Down and Bottom Up approaches.
4. Top Down: In Top to down approach, testing takes place from top to down following the control flow of the software system.
Test Stubs are needed to simulate lower level units which may not be available during the initial phases.
Advantages:
- Fault Localization is easier.
- Possibility to obtain an early prototype.
- Critical Modules are tested on priority; major design flaws could be found and fixed first.
Disadvantages:
- Needs many Stubs.
- Modules at a lower level are tested inadequately.
Entry Criteria:
- Unit Tested Components/Modules
- All High prioritized bugs fixed and closed
- All Modules to be code completed and integrated successfully
- Integration tests Plan, test case, scenarios to be signed off and documented
- Required Test Environment to be set up for Integration testing
Exit Criteria:
- Successful Testing of Integrated Application.
- Executed Test Cases are documented
- All High prioritized bugs fixed and closed
- Technical documents to be submitted followed by release Notes.
Best Practices:
- First, determine the Integration test strategy that could be adopted and later prepare the test cases and test data accordingly.
- Study the Architecture design of the Application and identify the Critical Modules. These need to be tested on priority.
- Obtain the interface designs from the Architectural team and create test cases to verify all of the interfaces in detail. Interface to database/external hardware/software application must be tested in detail.
- After the test cases, it's the test data which plays the critical role.
- Always have the mock data prepared, prior to executing. Do not select test data while executing the test cases.
Steps & Roles
1. Integration Test Plan: It includes the following attributes:
Methods/Approaches to testing.
Scopes and Out of Scopes Items of Integration Testing.
Roles and Responsibilities.
Pre-requisites for Integration testing.
Testing environment.
Risk and Mitigation Plans.
Role Participation: Business, Developer, QA
Integration Test Cases/Scripts: Integration Test Cases differs from other test cases in the sense it focuses mainly on the interfaces & flow of data/information between the modules. Here priority is to be given for the integrating links rather than the unit functions which are already tested.
Role Participation: QA
Integration Test: Please refer to Integration Approaches as described above
Role Participation: QA
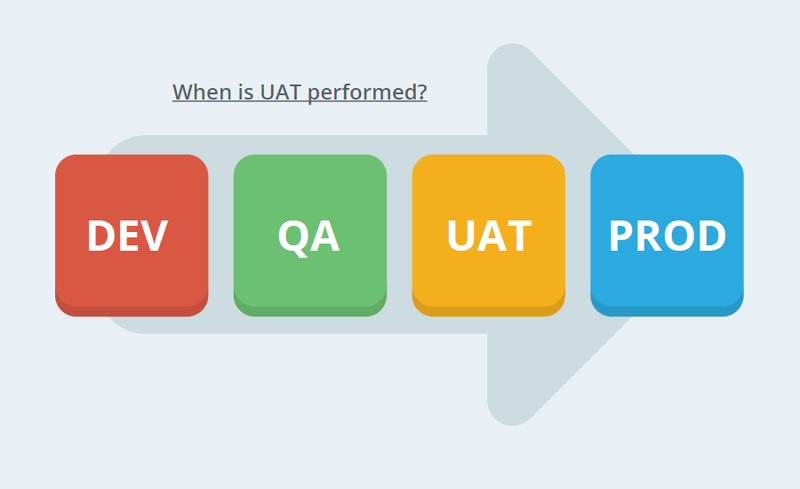
UAT (User Acceptance Testing)
UAT stands for User Acceptance Testing, refers to the process where software product is handed over to the stakeholders or say client/end users. They use the application for a specific time period and approves or rejects the software product or requirement(s). The product is released for production, when it passes the user acceptance testing.
User Acceptance Testing (UAT), also known as beta or end-user testing, It is the final testing performed once the functional, system and regression testing are completed. The main purpose of this testing is to validate the software against the business requirements. This validation is carried out by the end users who are familiar with the business requirements.
Entry Criteria
Entry criteria defines what is needed to start the testing. Since these conditions impact the commencement of UAT testing, it is necessary for QA team to understand the project, requirements and define the entry criteria’s accordingly.
All of the following tasks should be completed before commencing user acceptance testing:
- User story completed and signed-off (for each sprint in Agile)
- Completion of System and Integration Testing
- Completion of Regression Testing
- Validations undertaken against the Functional specifications
- All environment and access requests sorted out
- UI Validations completed
- Successful UAT sanity check is performed
- Ensured that there are no open critical defects /showstoppers
- Business Users identified
- Ensure 100% test coverage in system testing as per acceptance criteria defined in sprint planning
End to End UAT Validation - Objectives
- Applications are functional and stable
- Critical business process are intact & work as expected
- All transactions are properly integrated into the business process
- Data flow and data integrity is maintained across applications
- Ensure compatibility to browsers & operating systems if applicable
- Business user review sought on the usability aspects
- Performance of the application
UAT Exit Criteria
- Acceptance of Business Flows against Business Requirements by End Users of the System
- All UAT defects are fixed & UAT is signed off
Steps & Roles
1. Determine Correct User Roles: Define who from the team will be involved in the UAT process.
Role Participation: UAT Stakeholder, Product Owner, Business Analyst, QA Team
2. Choose the Type of Testing: Either in-person or self-paced, the type of testing is defined by the location of your team members
Role Participation: UAT Stakeholder, QA Team
3. Determine Time frames: Include a placeholder for UAT for the standard time frame your product team expects which could be 1 or 2 week depending upon mentioned factors
- Environment Standards
- Scope of Work
- Availability of Team
- Venue Availability
Role Participation: Product Manager, QA Team
4. Determine Documentation Standard: A list of standard documentation that is important to create and maintain
- Testing Strategy and Plan
- Test Case Outcomes
- Requirements for Sign-Off
Role Participation: Product Manager, QA Team
5. Determine the Change Control Process: Changes may come up during UAT. The project may have a standard process to manage 'change requests' that can be followed for incorporating these changes when they are needed.
Change requests may vary from project to project and will need to be discussed between the project / product managers and teams, where the appropriate actions may be taken to deliver the change (i.e. adding the change request to the Product Backlog e,g, a new user story to deliver for a later sprint, or delivering as part of the current Sprint).
Role Participation: Product Manager, QA Team
Assurance approach
Completing the 'UAT Testing' should be an Exit criteria for QA process and Entry criteria for Production Deployment
Exception process
The QA Manager and Project Manager should agree that this guide rail will not be followed for the defined projects/phases
Test Summary Report
A Test Summary Report should summarise the testing carried out by QA or a supplier in relation to software or software component delivery.
Reports will vary based on the method of delivery and associated dependencies.
As a minimum a Test Summary Report should contain:
- A summary of the progress of the testing through the test phase (planned against actual)
- Testing Scope
- The results of the test cases that have been executed
- All the defects that have been raised and their history
- Any outstanding actions
Contents of a Test Summary Report
The headings below are suggestions for what a Test Summary Report should contain.
The bullet points are examples or suggestions of content contained within those headings.
Relevance of the headings will depend on the type of testing being conducted and the application or system being tested.
Test Summary
- Release details
- Testing RAG status
- Summary of testing carried out and results
- Number of user stories
- Number of defects raised
- Number of defects resolved
- Exit criteria met
- Sign off acquired
- Any risks,recommendations and agreed actions.
Test Environments & Tools
- Integration
- Staging
- BrowserStack
- Applitools
Testing Scope
Include all the user stories planned and tested for the release.
Document type of testing carried out :
- Sprint release stories
- Integration testing
- Performance testing
- Regression testing
- Smoke testing (after deployment)
Out of Scope
Items not tested (due to constraints/dependencies/restrictions)
Test Results & Metrics
You can incorporate visual test and defect metrics along with a summary to facilitate the visualization of testing results i.e.
- Details of any automated tests performed
- Details of any manual regression tests
- A summary of the performance testing carried out, the results and their location
- Risks Issues and Caveats like
- Problems with test environment access or availability
- Automation tests failing, having to run tests manually
- Potential service impacts
- Best Practices Adopted or Improvements Implemented
- Crowd testing
- Updated Automation Regression Pack
Example Test Summary Reports
The examples below shows two variations of Test Summary Reports.
They all contain the key information required for stakeholders to make decisions regarding deployment or release based on the outcome of testing.
TCR - Online Fundraising Release 7.0
BA - 2019 January Release Test Completion Report
Assurance approach
Test Summary Reports should be completed and signed off before system/software is deployed to Production.
The Test Summary Reports should be stored in an agreed location and visible to key stakeholders
Exception process
The QA Manager and Project Manager should agree that this guide rail will not be followed for the defined projects/phases
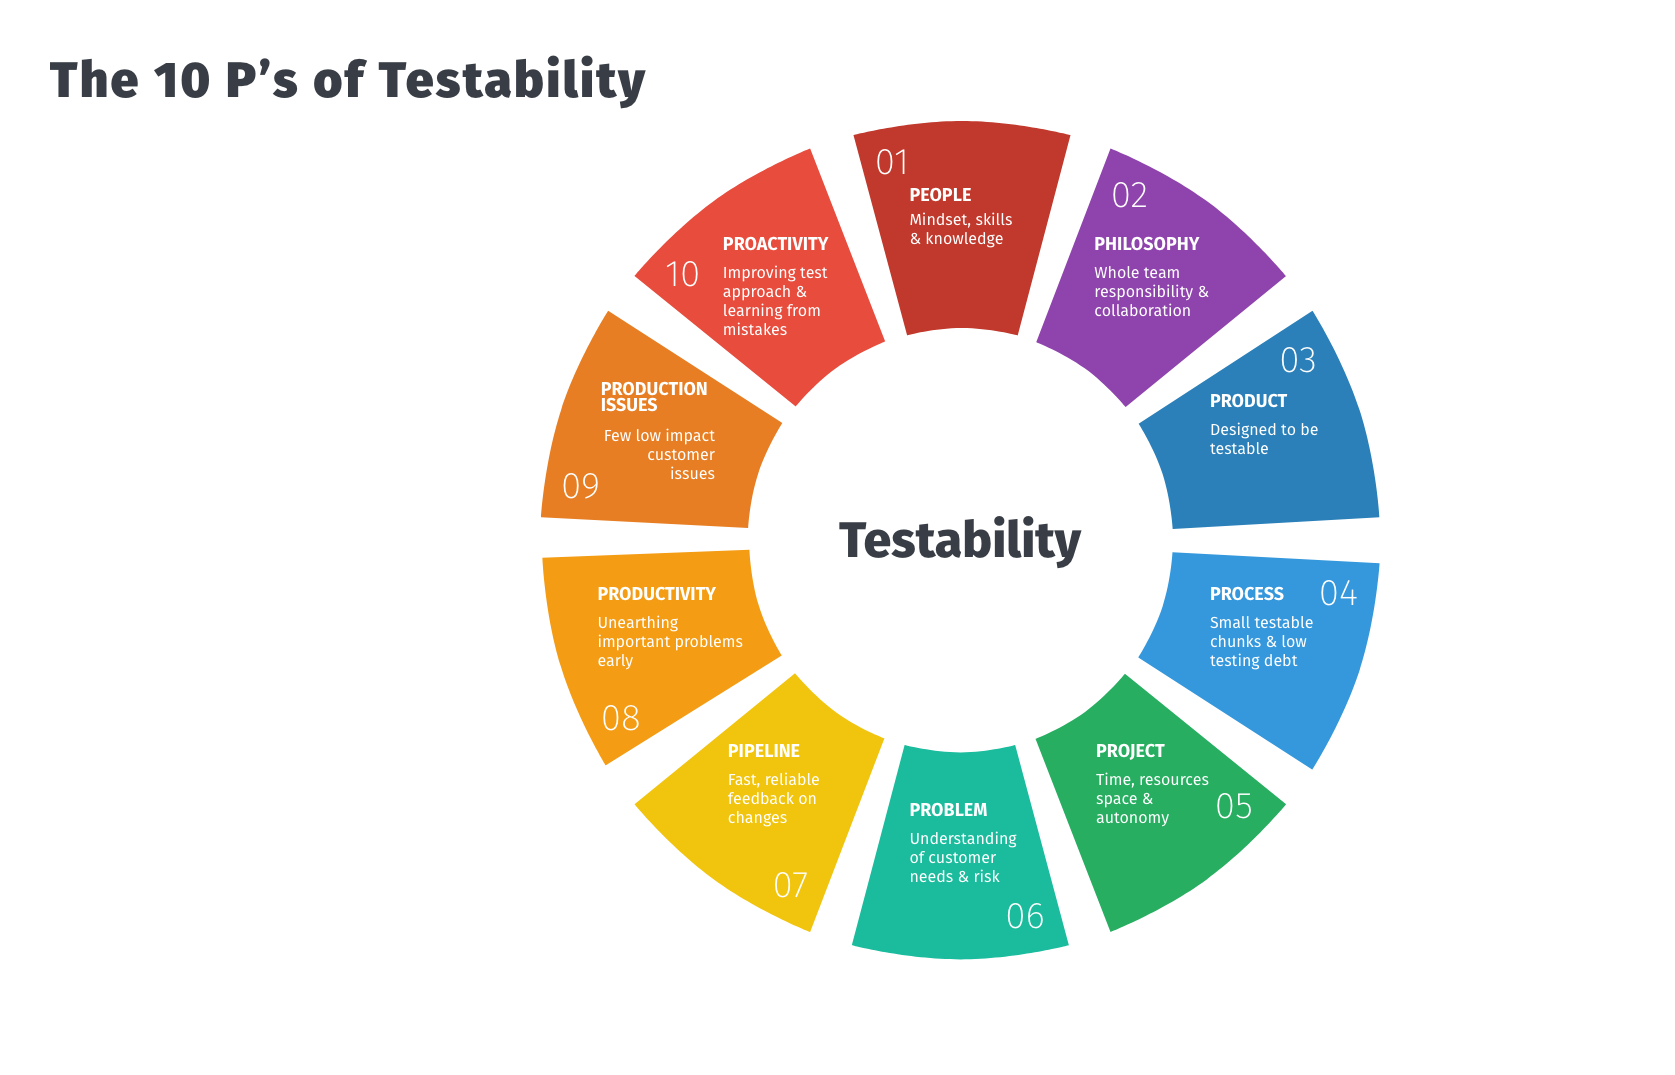
Testability
At its most basic level testability is used to determine two things:
- How easy software is to test
- How likely faults will be exposed
One of the key components of Testability is that it is owned by the ENTIRE team (Product/Dev)
Why do we need it?
High Testability positively impacts a team’s ability to deliver, providing:
- Faster testing feedback loops (bugs easier to determine, locate, log)
- Faster debugging (Actual fixes of relevant issues discovered)
- More frequent and shorter releases cycles
This complements the shift left approach seamlessly, as it entails actively considering the quality and testability of a release or product throughout the entire software development life cycle (SDLC), including the planning, design, and development stages, rather than waiting until a testing cycle is completed to assess its state.
How is Testability achieved or measured?
Different teams may have different ways of working (processes, systems, etc), but if the following is adhered to then Testability can be achieved regardless:
- Well documented requirements
- Clearly defined User stories/Acceptance tests
- Static analysis (examining the code without executing the program)
- Static testing (eliminate errors/ambiguities such as requirements, design, test cases)
- Applicable test artefacts (automated/manual test suite, test matrix/coverage)
- Code reviews
- Maintain Unit tests
- Logs (describe what happened and where)
- Accurate testing environments (replicate live instances)
- Dependency injection (a technique where an object receives other objects that it depends on)
- Mocks/stubs (mimicking functionality we don’t care about)
Conclusion
Testability ensures that we consider quality much sooner in the SDLC, enabling us to produce higher quality deliverables (features, products, etc) in a much more efficient and measurable way. Thus, should be incorporated into every product's SDLC process.
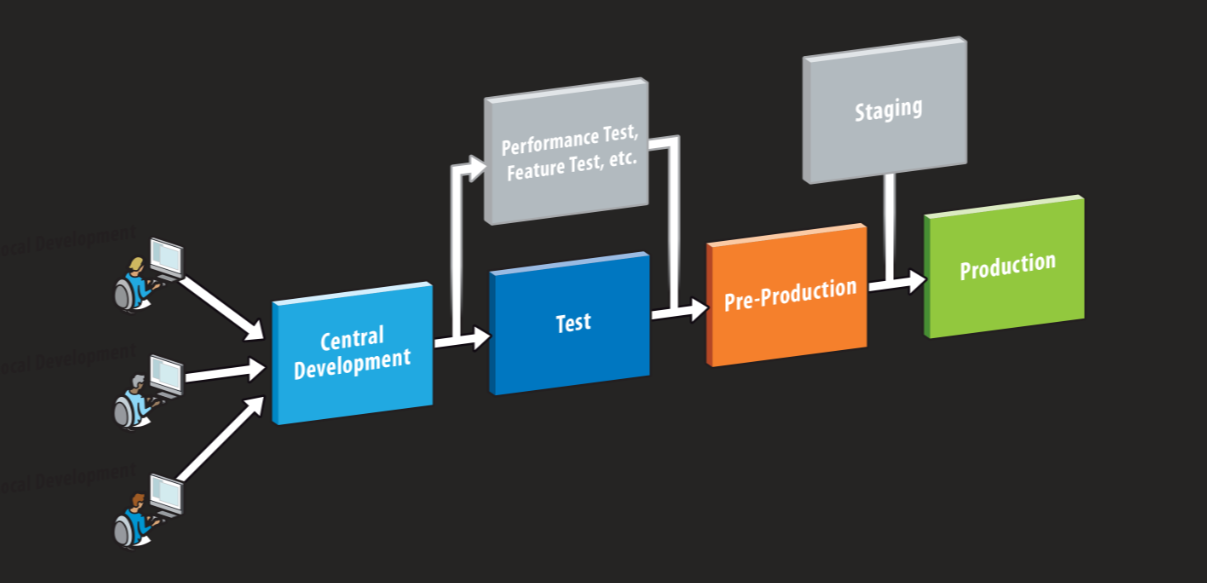
Testing in Production
Testing in Production means to perform various tests in a production state or live environment. Such testing at CRUK can include performing Smoke testing and OAT testing (CRM smoke tests).
When it comes to releasing a new product or new features of a product into Production, the primary focus of Production Testing is to test functionality that is critical to the application is working as expected. It is very crucial as these systems serve real world users and have a direct impact on customer satisfaction.
Its purpose is to quickly identify fundamental issues that would make further testing impractical. It allows testers to detect defects in real world scenarios, and ensures that the application works the way it is expected to after deployment.
Testers are usually given a separate QA environment to perform end-to-end testing and are not usually allowed to perform testing in a production environment due to various reasons like impact to user data , avoid sending out emails to user.
As per standard practice, only smoke tests are carried out in production environments. These smoke tests need to be planned and agreed with business teams carefully.
How should Testing in a Production Environment be Performed?
It is ideal to create a checklist for the testing that will be carried out in Production. This should cover the main functionality of the application, which is reviewed by the project team. Also, if required, the modules in the application can be divided into small chunks and distributed amongst the QA team to test and check for quality of the application. QA Engineers must ensure that a checklist is maintained and updated regularly with any new critical tests to maintain the quality of the application.
The monitoring of production servers is managed by the Release Team to ensure that all services are running smoothly and no glaring errors are flagged. This is done by assessing or monitoring audit logs on server or by using Dynatrace dashboard or admin pages in php sites.
Guidelines to Performing Testing in a Production Environment
Outlined below are some guidelines that must be followed whilst testing in a production environment:
- Make sure access to the environment is available / granted
- The aim is to test using real data as far as possible or to carry out static reviews for Siebel Releases
- Dummy data can be used as long as it is agreed with the business stakeholders
- Never modify existing live data as part of your testing
- Never try load testing on a production environment
- Any issues found during production testing are generally raised in JIRA/Service now and fixed as hot fix (if required).
Entry Criteria
- UAT has been signed off and a GO decision is given
- The code/release has been deployed to the production environment and communicated to the project/product team.
Exit Criteria
- All tests on the production test checklist (Monitor logs, Sanity test, OAT scripts, End-to-end connectivity) have been executed and no issues have been reported
- Any issues reported are logged and the project/product teams are made aware of these.
Quality Assurance approach in a Production Environment
The ultimate goal of Testing in a Production environment is to ensure that the application is stable and runs the way it is expected to in the production environment. Daily monitoring of the production/live environment gives confidence to the business that the application is running smoothly. E.g.
- For CRM project - Server Components and Jobs, Active MQ queues, DLQ, Rectification errors, Audit logs.
- Other projects - Set up dashboard for server CPU usage, memory usage monitoring .
Here are some advantages of Testing in a Production environment:
- Monitors the application’s performance in real-time scenarios. E.g.- Multiple users donating on same fundraising page.
- Monitors the API responses with peak traffic
- Helps with maintaining the quality of the application for user experience.
Test Coverage
In simple terms: What are we testing and how much are we testing? Test coverage helps monitor the quality of testing, and assists testers to create tests that cover areas that are missing or not validated.
How Test Coverage can be accomplished?
- Test coverage can be done by exercising the static review techniques like peer reviews, inspections, and walkthrough
- By transforming ad-hoc defects into executable test cases
- At code level or unit test level, test coverage can be achieved by availing the automated code coverage or unit test coverage tools (static analysis tools). Note: Static analysis tools can help developers to understand the structure of their code, and can also be used to enforce coding standards
- Functional test coverage can be done by converting acceptance criteria to tests or even using requirement traceability matrix as applicable.
Advantages of Test Coverage
- Helps finding the area of a requirement not implemented by a set of test cases
- Helps to create additional test cases to increase coverage
- Identifying a quantitative measure of test coverage, which is an indirect method for quality check
- Identifying meaningless test cases that do not increase coverage
- It can assure the quality of the test
- It helps with determining the paths in your application that were not tested
- Prevents defect leakage
- Time, scope and cost can be kept under control
- Defect prevention at an early stage of the project lifecycle
- It can determine all the decision points and paths used in the application, which allows you to increase test coverage
- Gaps in requirements, test cases and defects at the unit level and code level can be found in an easy way
- Useful in determining the exit criteria
Drawbacks of Test Coverage
- There are no tools for automation, so most actions are manual
- For legacy applications there can be a cost and time overhead for requirements and test case analysis
Code coverage
It is a metric related to unit testing. The idea is to measure the percentage of lines and execution paths in the code covered by at least one test case. Since code coverage is a unit test metric, tools for checking code coverage like Istanbul/ NYC can run alongside unit testing software like Mocha and Jest or are integrated with the unit testing software like PHPunit, so whoever is writing the software can check their code coverage. The code coverage tools given in the examples are used at CRUK. In Online Fundraising PHPUnit is used for code coverage of the web service, a report is generated in Clover format which then feeds into the Github Actions coverage checker. Code coverage measures the coverage of what has been written, i.e. the code itself; it cannot say anything about the software that has not been written.
Test coverage
It is the process you use to determine whether you’re testing everything you’re supposed to test. This includes the application itself (the codebase), the environment the application will run on (e.g. browser, devices, operating systems) the user demographics (including accessibility), the performance of the application and its security. Test coverage also includes whether requirements have been met from technical and user perspectives. Test coverage allows you to check the quality of your testing. By finding areas that aren’t currently covered, test coverage helps you develop tests for those areas, increasing the overall quality of your test suite.
Anyone with knowledge of the system or application being tested can contribute to the scope of test coverage.
At CRUK we use numerous tools and techniques increasing our test coverage capability, some examples:
- Mocha, JUnit, Jest, PHPUnit for unit testing code
- Applitools for device and browser compatibility testing
- K6, Artillery and Lighthouse for performance testing
- Lighthouse , @axe-core/playwright package as part of Playwright tests for accessibility testing
- Playwright Test Library for functional and regression testing
- Postman for API testing
Test Coverage Techniques
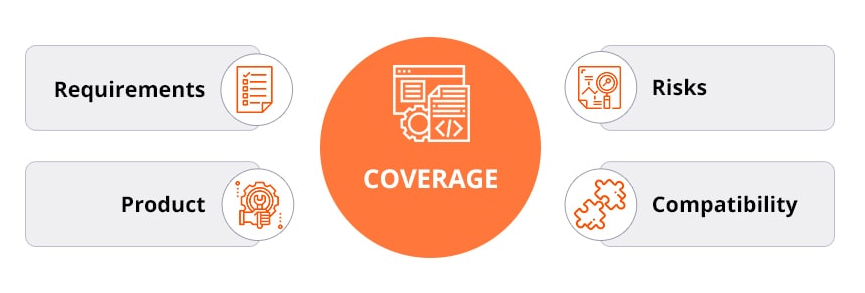
There are several areas for test coverage which are essential to examine with the respective coverage techniques:
-
Product Coverage This measures the test coverage from Product Perspective where we measure which areas of the product have we tested? Example: The app must be capable to respond to the unusual actions of the user. It must be checked whether the multiple users can interact with a program at the same time. It is also important whether the application is able to function properly while other apps are opened on the same device. If at least one of these elements is not tested, it is impossible to define the testing as complete. Let’s say the application you’re testing is a simple calculator (only the four arithmetic operations available.) Of course, you should verify that the operations work as intended. But only that is not enough. There are other factors you must take into account. How well does the calculator handle really large numbers? (In other words, what’s the range it supports.) What is it's behaviour when the user does something unexpected, like pasting non-numerical characters into the text field or trying to divide by zero?
-
Risk Coverage: This technique consists of listing the risks involved in the application and making sure they’re covered by tests. Example: Online Fundraising has a web service. This API should only be exposed to specific applications like Events or Activity Management, as it contains personal information of supporters. In addition to this donations can be made via the platform, so requires handing the donor over to a payments system and retrieving those details. Testing coverage should include all possible supporter journeys between applications to ensure the applications are integrated correctly and securely and there is no risk of data extraction or interception by unauthorised sources. If you want to say that your application is covered, you have to list all of its relevant risks and answer the questions they elicit.
-
Requirements Coverage: This stage aims to define whether the developed product matches the expected requirements and is capable to perform its purpose. Example: Online Fundraising has a Strava integration. Requirements were derived from business users and end user tests. Requirements coverage included checking the technical functionality of the integration for example: a giving page could be successfully linked to a Strava account. Requirements coverage also included functional testing from a user perspective, including crowd testing to get interactions from a wide user base on multiple devices, to ensure users were able to use the functionality set out in the defined requirements.
-
Compatibility Coverage: It defines the integration of the program with different browsers and platforms. It shows the issues in cooperation with devices that have various settings and configurations.